
Showing posts with label Canning. Show all posts
Showing posts with label Canning. Show all posts
Thursday, July 31, 2014
Canning Green Beans....with Flavor!
I was recently very fortunate to have run into a fellow gardener. The gentleman, who instructed me to call him 'Coach', has been growing vegetables of all kinds nearby for several years now. In a fortuitous meeting, he informed me that his wife just might hurt him if he brought home any more green beans, and to help myself to as many as I could pick.
He's easily got four or five dozen plants. So it's off to the drawing board. The first thing I ever learned how to pressure can was green beans. With canning salt. And water. Now don't get me wrong, they were as good as any canned green beans you get from the store, but really, how good is that?
Thursday, June 5, 2014
Tips for Beginners (Canning)
I had a friend pose the question recently if I had any tips for new canners. Well I can certainly think of a few! I'd love to hear more from any of you who have tried some home canning, from fellow beginners to pickled veterans. In the meantime, here's a handful.
(These are mostly aimed at water bath canning, fyi)
(These are mostly aimed at water bath canning, fyi)
- Have a stack of hand towels or rags at the ready. You'll need one damp one to wipe the rims, a dry one to hold the jars while doing so, and there's a great chance that you'll just need a few extra. Trust me on this one, you don't want to be running in circles around the kitchen after you've just dropped a huge glob of jam on your big toe!
- Never put your hot glass jars, empty or full, on a bare countertop, oven, or table. That gives them a great opportunity to crack and ruin your project. Or your will to can.
- Take a medium sized baking sheet and line it with a hand towel. Sit this next to your canner and use it as a jar-friendly counter space. Not only will the towel keep the jars safe, but if a jar should crack, the contents will mostly be caught by the baking sheet. One less headache.
 |
| Admittedly a little hard to see...but you get the gist. |
Sunday, May 25, 2014
Prepping Cherries for Canning
.jpg)

Sun-kissed and dog tired, loving every minute of it.
Tuesday, May 13, 2014
Time to get going! (Again...)
Today I got a wild hair and decided it was time to make with the canning. So I asked Boo how he felt about going to the strawberry patch for some picking.

The answer is pretty self-evident.
Saturday, November 30, 2013
...But PLEASE don't lose that (turkey) butt!
Turkey got back! Haha, I amuse myself.
Probably two days late and several dollars short on this post, but on the off chance that you haven't cooked your turkey yet, or if the whole shebang is sitting in the fridge, don't toss the carcass! Making turkey broth is stupidly easy, and can still be navigated even if you're not into canning. I'm not going to go into a fully detailed tutorial as I don't have pictures to aid, but I will provide several links to blogs that do.

Probably two days late and several dollars short on this post, but on the off chance that you haven't cooked your turkey yet, or if the whole shebang is sitting in the fridge, don't toss the carcass! Making turkey broth is stupidly easy, and can still be navigated even if you're not into canning. I'm not going to go into a fully detailed tutorial as I don't have pictures to aid, but I will provide several links to blogs that do.
Wednesday, November 13, 2013
'A' is for Autumn and Apples!
Hubs and I took our yearly vacay to the mountains this past weekend. We have friends there, and since both of us grew up near the beach, we like to change up the scenery every once in a while. It was a beautiful weekend to go. The evenings dipped into the 30's, but the days were bright and merely brisk.
On our way out of town we stopped into the farmer's mart and got some goodies. Sold by the bushel, 'deer apples' are apples that hit the ground naturally before they can be picked off the tree. They are somewhat bruised, but otherwise completely edible. Hubs has been lusting over the thought of making apple cider, so he picked up a box with that purpose in mind. We had also already grabbed a peck of hand picked Arkansas Black apples. (We planted an AB the same day we planted all of our other trees, but this year it decided to go to tree heaven. So we figured we'd have to buy them if we ever wanted to try any!)
We also got a quart of local honey with honey comb in tact (nom!), some very fresh heads of cabbage, and a cream soda. For me. Delish. Oh, and when we were leaving home we came across a guy selling half bushels of sweet potatoes, so we bought two! Think I'll have my work cut out for me soon enough...
Wednesday, August 14, 2013
Candied Jalapenos...Ole!
In my seemingly eternal search to find practical uses for jalapenos, I have stumbled across the heavenly candied versions. I am really quite crazy about them. If you don't believe me, there will later be a post outlining all of the scrumptious uses for these toasty tasty treats!
Candied Jalapenos:
-A bunch of jalapenos (I think I had 3 or 4 pounds?)
-2 cups cider vinegar
-6 cups sugar
-spices*, about 1-2 tsp of each
*(play around! This time I did red pepper flake, onion flake, and garlic powder, last time I did the more traditional turmeric, celery seed, mustard seed, and garlic cloves. The jalapenos are so hot that it would be very difficult to overpower their flavor.)
1. Slice the jalapenos (and don't breathe, blink, or touch anything). You can leave all the seeds in and try not to die, or remove all of them, or do like I did, and dunk the slices in water, and some of the seeds will slice and fall to the bottom.
2. Bring vinegar, sugar, and spices to a boil, add the jalapenos and bring the pot back up to a boil.
3. Remove jalapenos with a slotted spoon, placing in a bowl and set to the side. Bring vinegar mixture to a rolling boil and leave for about 10 minutes.
4. At this point you can re-combine the peppers and syrup and stick in the jars, or put the peppers directly into the jars and pour the syrup over them, depending on your preference. Leave 1/4" headspace and process in boiling water bath for 10 minutes.
On a side note.
The person who invented the phrase "What doesn't kill you makes you stronger" was not talking about jalapenos. If they had been, the saying would go "What doesn't kill you makes you want to die."
Keep that in mind. I kept getting choked up and sneezing as if I were allergic to the things. Think it was just my body trying to exorcise the demons.


Bring the vinegar to a boil & dice/seed jalapenos.

Bring the jalapenos to a boil and then remove.


The long boiling time allows the vinegar mixture to become syrupy. If you want the sauce to be less thin, try boiling for about 5-6 minutes instead.

Ta dah! These suckers are so hot, but sooooo tasty.
Sunday, August 11, 2013
Diced 'Maters


Boo chowing on a 'mater and bravely considering a jalapeno.
A few weeks ago I was
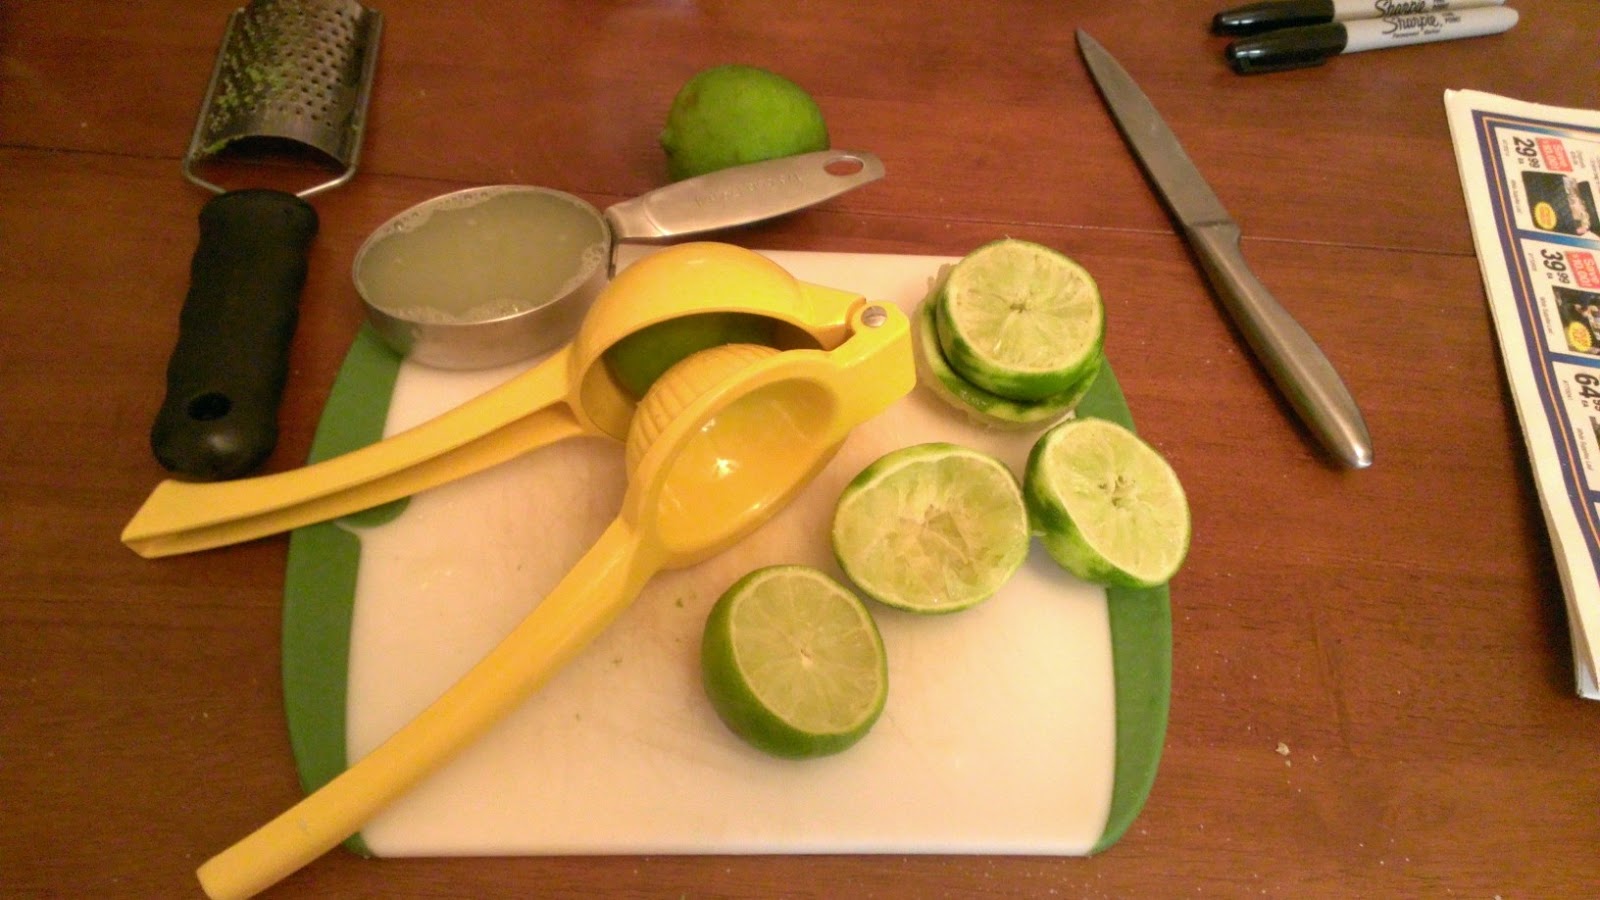
Tomatoes. Hundreds of 'em. Every other day it seems like, I get a fresh grocery bag of tomatoes from the garden. I am up to my eyeballs in tomatoes! This change of pace is bittersweet. In my mind, tomatoes are a much more versatile option for canning. I could make at least a dozen different dinners based off of canned tomatoes alone, and then there's spaghetti sauce, pizza sauce, sloppy joe mix, chili base, etc. The bitter in this sweetness is the fact that tomatoes are a real bitch to deal with. The extra steps of boiling them for a few minutes and dunking them in ice water so that you may then strip their skins off (not to mention the additional dirty dishes) is a pain in my rump.
Not only that, but on top of all of the intended ones, we've had several surprise tomato plants spring up on us! There's one around several of the fruit trees in our backyard from when we spread compost at the beginning of the season, not to mention one that is literally as tall as me growing out of our compost pile. Another great reason to compost!!
*Sigh* I don't mean to sound ungrateful. I am quite happy (and impressed...you go Hubs!) with the bountiful harvest we have received. The vast majority of our tomatoes have ended up being Romas, even though we planted them equally alongside beefsteak, cherries, and vine tomatoes. Go fig. So far I've tackled two batches of 'maters and will be starting a third tomorrow. There is going to be so much chili in my future. My love of everything Autumn keeps me motivated.
I love this site. It's simple, to the point, and just doesn't church anything up, which I'm all about. I used their process to do some diced tomatoes. I had, oh, I dunno, about a zillion of 'em, and ended up making 8 or 9 pints.

My tomatoes, sans skins.

Right, so I uh, didn't have any bottled lemon juice. A few months ago there were a bajillion limes on sale, and I juiced and froze some. So I put a cube in each jar, and a teaspoon of canning salt.

I ended up not dicing my tomatoes and instead throwing the smaller ones in whole, and pulling the larger ones apart with my fingers. I threw them in a stock pot, added enough water to cover, and boiled them for five minutes. This is what it looked afterwards.

Packed into hot, sterilized jars.

I chose the option of pressure canning my tomatoes. Because of their acidity, they're safe to water bathe as well. They have to stay in the water bath for 40 minutes, while in the canner they only take 15. Really, though, it's all in whatever you're comfortable with.

The beauties!
[8/2/14 Edit]- When I made these tomatoes, I thought the three or four batches I did would last me all year! In reality, they were gone by October. You would be utterly amazed how quickly you'll go through a stockpile of home canned tomatoes. They make everything taste so much better that you'll want to make chili or sloppy joes twice a week!
Thursday, August 8, 2013
Canning Jars on Sale!!!
This is less a blog post and more a PSA. I just went in to my *ahem* Neighborhood Ace Hardware, and found that a crap ton of their canning supplies are on sale.
Every Ace is different, but this was the deal at ours. At least one of each size of jars were on sale, but the best deal I saw was 12 packs of pint jars on sale for $7. Needless to say, those jars are long gone, but my store ordered two cases specifically for me that I can pick up on Monday at the sale price. The tags said the sales would continue until August 31st, so I may be getting a lot more than two cases in the long run. What a great size too!
Anyway, if I come across any other great deals on goodies, I will keep you all posted!
Tuesday, July 23, 2013
Sweet Heat Relish (aka Slacker Relish)

Ingredients:
-8 C cukes, seeded and chopped
-2 C bell pepper, seeded and chopped
-1 jalapeno, seeded and finely chopped
-3 C chopped sweet onions*
-1/4 C pickling salt
-3 C sugar
-2 C cider vinegar
-1 tsp celery seeds-1 tsp red pepper flake
-1/2 tsp cayenne pepper
-1/2 tsp turmeric
*I made bread and butter pickles a few weeks ago, you know, the kind with the onions in them? Hubs ate all the pickles and left the onions behind, and said he thought I could use them for relish! Genius, that man. If you happen to have a similar scenario, just use fresh onions to make up the difference in the 3 cups. And don't put the B&B onions in the salt brine, add them when you put everything else in the pot.
1. Combine cukes, bell pepper, jalapeno, and onions in a large nonmetal bowl. Sprinkle salt and cover with water. Let sit at room temperature for 2 hours. Rinse and drain well.
2. Bring sugar, vinegar and next 4 ingredients to a boil, add drained ingredients, and simmer for 10 minutes.
3. Process in a boiling water bath for 10 minutes.

Earlier I posted about how I was SO. SICK. OF CUKES. I went through my fridge and found this many more hiding in various places! But I only used about 4 or so to get the 8 cups.


Chop, seed, dice, repeat.

About 4 smallish bell peppers and 1 jalapeno. (Don't fear the jal! It's really not that hot, I promise)

The onion remainders of my bread and butter pickles.

Dice, stick to the side as they don't need to soak in pickling salt.

Chop chop. I think you get the picture.

+Salt.

+Water. Wait 2 hours.

Sim-simmah!

Here were my results! Seven jars. But I packed my relish pretty tightly. The last time I was a little more lax and got about 10.
When I ended up with 10 jars of relish about 3 weeks ago, I figured most of them would end up in Christmas baskets. After all, we've had the same jar of grocery store relish in our fridge for approximately....I dunno, 6 months or more? We're already on our 4th jar. It's just so much better, and turns simple meals like chicken or tuna salad into an instant treat! Plus everyone loves sweet relish, so it makes a great butter-'em-up present!
Wednesday, July 17, 2013
Dill Pickles
The other evening I was sitting in my kitchen. I was thinking about how quickly I'm starting to get sick of pickles. Then something happened to my laptop, and all of a sudden I somehow discovered that this thing has a web cam!

Contemplating life and pickles.
Even that couldn't excite me.
See, Hubs and our friend Justin decided to do a shared garden this year. It's over at his house, but it's pretty massive. They started everything from seed, including (but not limited to) beets, radishes, cucumbers, corn, squash, jalapenos, cucumbers, okra, 4 kinds of tomatoes, blue lake beans, cucumbers, sweet peas, and cucumbers.

Everything AND the kitchen sink!
In retrospect I don't know what the hell any of us were thinking planting that many cucumbers. I was getting a grocery bag full just about every week. And that was only half of the total, as we split everything down the middle. Of course, on a positive note, it did certainly give me lots of practice in canning. I only started a month or two ago.
So far I've made bread and butter pickles, sweet relish, sriracha pickles, sweet heat pickles, hot relish, and now dill pickles. I'm not even that crazy about pickles!!

Anyway, Dill pickles were the furthest down the priority list. I'd rather have sweet ones or relish any day of the week, but I figured hell, we should go ahead and have the variety. Hubs found me a wonderfully resourceful list of traditional Amish canning recipes that I worked off of. Unfortunately I didn't have any pickling spice, though, and since I'm kind of lazy (some might say 'thrifty'), I just decided to use what I have. This is what I jammed in there.
Per quart jar:
-1 garlic clove
-1 dill sprig
-1 allspice berry
-1 tsp mixed peppercorns
-1/4 tsp celery seeds
They were delish! I highly recommend this recipe. Nom nom! (I'm still sick of pickles, though.)


Ain't they purdy?
Monday, July 15, 2013
Orange Failberry Jam
Yesterday I posted about how I made a blueberry lime jam out of a really old canning book using liquid pectin. Well today I'm posting about how I tried to make orange blueberry jam out of a current book using powdered pectin. NO BUENO.
Well, to be fair, it is bueno. I mean the taste is just wonderful. But the consistency? Well, the consistency leaves something to be desired...


Well, to be fair, it is bueno. I mean the taste is just wonderful. But the consistency? Well, the consistency leaves something to be desired...
Mashing the blueberries. Don't they look so pretty?
And the jars, they're so pretty also!
But this. This is what I get when I open the jars. It has the consistency of store bought cranberry sauce. However the taste is incredible! So maybe my family will be having blueberry sauce instead at Thanksgiving this year?
This is the first time I've used powdered pectin, and obviously it didn't work out too well for me. I mean, this could be worse. I did some troubleshooting on the topic, and found that I most likely overcooked it. The stove in my house is not only older than me, but also older than my parents. It's not always the most accurate thing in the world. It pretty much has two settings; off and over-boil, so we'll lay the blame over there.
Anyway, I'm sure I can use this in baking or...I dunno, something. When I figure out what it's good for, I'll get back to you. Just in case this ever happens to you also.
Can I just put it out there that I spent about 3 hours making this jam last night? Well. Okay, so it took me three hours to clean my kitchen to the point where it was plausible to can anything, make the jam, can the jam, and clean afterwards. All for this. I'm trying not to be frustrated about it, but hell it's Monday. And by Monday, I mean Failday. Happy Failday everyone! You'll get through it soon enough.
Sunday, July 14, 2013
Blueberry Lime Jam
A friend of mine loaned me her older Ball Blue Book Guide to Home Canning and Freezing. Older, in fact, than me. But it has tons of recipes and ideas, so I thought I could at least take a flip through it. In my search for ways to can blueberries, I found a recipe in this book for blueberry lime jam. And lucky me, I just happen to have a whole mess of limes in the fridge with no real purpose. What I did not have in stock, however, was the two pouches of liquid pectin. Truth be told, I've never used pectin before. I prefer the sugar + fruit recipes personally. Ah well, may as well get around to using it!
Blueberry Lime Jam
-4 1/2 cups blueberries, washed and drained
-1 tbsp grated lime peel
-1/3 cup lime juice
-6 1/2 cups sugar
-2 pouches liquid pectin
Place blueberries in a large saucepot. Add lime peel, lime juice, and sugar. Mix well. Bring mixture to full rolling boil, stirring constantly. Remove from heat and stir in pectin***. Pour, hot, into jars, leaving 1/4" head space. Process 15 minutes in water bath.
Remember how I said that I'm stubborn, I take shortcuts, and am sometimes lazy? Well. I know it said to add the blueberries to the stockpot first, but they were damp from being rinsed, so I just thought I'd measure out the sugar first, then get the sugar residue out of the measuring cup with the water from the blueberries. Honestly. I wasn't even going to use the damn cup after I was done, I don't know why I found this necessary. DON'T DO WHAT I DID. It made this simple recipe a butt pain.
Also, did you even read that recipe? SIX cups of sugar to 4 cups of blueberries! That is a mess of sugar. Go on and buy the biggest bag of sugar you can find. Especially if you're gonna do some for real canning.
Took me about 3 limes to get my 1/3 of a cup.
Yeah, this is why they say add the blueberries first. This is again one of those times I'd like to go back and smack myself in the head. Anyway if you do it like you're supposed to, your pot will hopefully not ever look like this, and will instead just look like...
This.
Rolling boil and whatnots. Next add the two pouches of liquid pectin, and see below.
***Any safety tips for canning article will tell you not to use older canning recipes. Well personally, I don't like to abide by rules, even though you definitely should. One thing I like less than rules, though, is botulism. And even less than that, non jelling jam. So to be safe, I read the instructions that came with the pectin to see if there were any differences. It said to let the jam boil steady for 1 minute after adding the pectin, whereas the book recipe called for you to pour the pectin in and then ladle it directly into the jars. I did the 1 minute boil to be safe, and everything worked out fine, so I'd recommend that. Better safe than dead from botulism.
I generally skip pics of the water bath canner, but you stick these bad boys in a big boiling stockpot for 15 minutes. The canning guru who taught me the craft told me to use a cookie sheet lined with a hand towel. Not only can you move everything with ease once you're done, it will also contain any mess in the event of a cracked jar.
Here's the result! I was pretty curious about how it would taste, but I must say that the lime really compliments the flavor of the blueberry. Hubs was immediately bugging me about how soon he'd be able to eat some more. One great thing about this recipe is that it had a fairly high yield versus how many blueberries you have to use. Eight half pints from 4 1/2 cups of blueberries is pretty awesome. There will be sooo many of these bad boys in the Christmas baskets this year!
Jam on, friends.
Subscribe to:
Posts (Atom)